
TLDR: I made some custom quick release panniers out of peli cases for £300
I thought it’s time I share a little project I started after trying to find some hard panniers that are in my price range <£250. After many evenings looking for a solution I concluded that it’ll be cheaper and easier to make my own mounting system and panniers.
I start with a Moto Adventure Tech set of luggage racks (Figure 1), with the goal of making some panniers that have enough capacity to hold a weekend's worth of camping equipment. I’m able to do a weekend away already with a 30l dry bag and tent strapped to the bike, this is doable but very much on the lightweight side for my liking. It’s also quite stressful strapping everything down and hoping it stays attached at 60mph. For this reason I’d like some hard panniers with a total volume of 44l in total (22l per side).
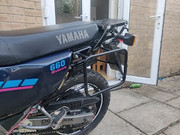
Figure 1: Bike with Moto Adventure Tech luggage rack on
Next, what panniers to buy? Well after looking at available motorbike panniers I don't know how brands get away with charging so much for what are essentially big metal boxes (they’re not even lightweight). So while in the shower it hit me…
Peli cases (not genuine ones obviously, but they’re basically the same). They’re cheap, strong, waterproof and relatively lightweight. Plus they’ve got handles on so they’re easy to carry around when you need to remove them from the bike. The next problem was how do I attach them to the bike…
After searching the web again it was time to design my own mounting system. I used a chopping board to template the clamp positions and with a bit of trial and error with different sorts of clamps, I came to this setup shown in Figure 2a and b. To provide a tight fit, the luggage bars have some duct tape wrapped around them to make them a bit thicker and to provide some vibration damping to the panniers.

Figure 2a
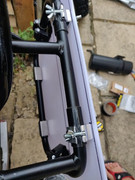
Figure 2b
Once this template was completed I set about drilling holes into my cases to attach the clamps. I attached the clamps into the lid of the case, this allows the case to be opened while on the bike for fast access at the side of the road (like getting the stove for a cuppa or some tools). It also means the case sits flat on the floor when the cases are removed from the bike. It also allows an ‘oh shit strap’ to the handle of the panniers, so if the clamps or case closures fail the case won’t fall off (Figure 3).
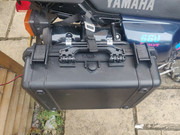
Figure 3: Pannier attached with clamps and ‘oh shit strap’
With regards to opening whilst the case is on the bike, I used some paracord, d rings and a guy rope tensioner to support the weight of the case contents while open (Figure 4). By using the guy rope tensioner this allows the angle of the case to be changed so it can be used when the bike is at any angle, this angle can be adjusted one handed too.
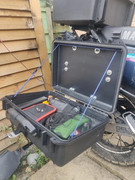
Figure 4: Tension system
With both side panniers on the bike, the pillion footpegs are still accessible and usable. The total width of the panniers is not wider than the handlebars so crashing into bollards is less of an issue. Figure 5a and b show the bike with the side panniers attached. These side panniers came to ~£225 including all the hardware.
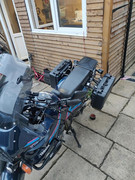
Figure 5a
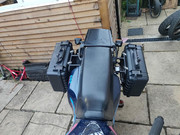
Figure 5b
In addition to the side panniers I’ve also made a top box which is much bigger than the side panniers (Figure 6a and b). Unfortunately, this case is not removable like the side panniers, that is a project for over winter. Due to it not being removable this is where I store my tent, camping chair, jackets and all of the things that are immediately removed from the bike once you’ve arrived at a campsite. This top box is big enough to store my biking trousers and jacket in too. When the top box is on a pillion can still sit on the bike but it is a squeeze and I wouldn't recommend it.
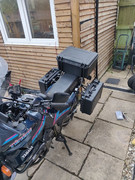
Figure 6a
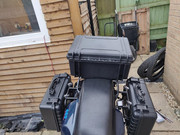
Figure 6b
After a few weekends away around the Mendip Hills and mid Wales I can say that these panniers work an absolute treat. The total cost for this setup (side and top boxes) came to just under £300 excluding nuts, bolts and orings I already had lying around and around 10 hours of my time (including research, prototyping and building).
If you like this build and are interested in making your own panniers this way, I’m happy to supply all of the mounting hardware that you’ll need. Feel free to get in contact with me and we can arrange shipping etc.
Happy riding,
Mike


